

Face-casting
Christian Hanson
LIfe casting is an essential element to prosthetic makeups. Though high-quality latex and foam appliances exist on the market, any serious makeup enthusiast will get to the point where he or she will need to create his or her own custom prosthetic appliance. Before any sculpting, casting or application can begin, one must create a life-cast of the makeup subject. Though it may seem daunting at first, with some patience and practice, most people can learn to create a basic face-cast. The following is a short description of a basic face-cast that I made for a film student's project. This should provide you with the basic steps to get you started in your own attempt at life-casting. Before you begin, learn what you can about the process and take all recommended safety precautions. Children should not try this unless supervised, and adults must take responsibility for their subjects comfort and safety during the life-casting process.
Materials: To create a face-cast like the one described here, you will need the following materials: alginate, plaster bandage, Hydrocal casting plaster, petroleum jelly, a spatula and burlap. Alginate is the goopy material that the initial mold of the face is made out of. It is flexible when set, and non-toxic. If you have ever had your teeth cast by a dentist, you will recognize this material. The type used for face-casting is similar, but has a much slower setting time. For this face-cast, I used Accu-cast brand alginate. All of the materials used here can be purchased from Burman Industries (www.burmanfoam.com). For a cast of a face, the 2.5 lb. package should be enough, but if you plan on doing more life-casts in the future, you may want to invest in one of the larger packages. Extra-Fast Setting Plaster Bandage is used to build a rigid mother mold so that the flexible alginate maintains its shape once removed from the subject. I prefer the 6" wide bandages from Burman. You will only need a roll or two for a face, but it’s always good to have more available. Hydrocal Plaster, Burlap and a small, disposable brush are used to create the final cast.
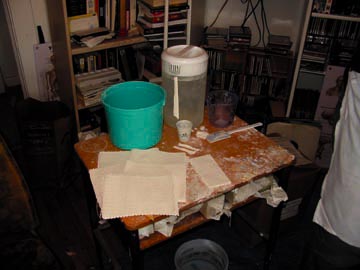
Step 1) Set up: Have of your materials set up before you begin the life-casting process. [picture 1] You'll be too busy during the casting process to search around for your materials. Pre-measure the alginate and water. In a recent issue of Makeup Artist Magazine (issue #34), makeup legend Dick Smith recommends using 114g of Accu-cast 8-80 blue alginate to approximately 414 ml warm water for a life-cast. I found this to be just enough for a small face-cast, and a bit too thick, but overall a good starting point. The manufacturer of the alginate should provide mixing guidelines as well. If you are using another brand, follow the mixing proportions provided. In addition to your main mix, have some extra alginate and a pitcher of water ready in case you need to add either to make it thinner or thicker.
On such a small cast as the one here, one does not necessarily need to measure out the plaster bandage for specific areas of the face, as one does for a larger cast. Just rip off several strips folder over twice, thus making the strips four layers, of approximately 5" each. You may need a few smaller strips for smaller areas, and a small strip for between the nostrils. Make more than you'll need, since you can always use them for your next casting, and having extra is better than running out in the middle of a casting. Also, prepare a bucket of very warm water for dipping the plaster bandages. The warm water will speed up the setting time.
Step 2) Prepare the subject: It's a good idea to give the person you are casting a general idea of what he is about to sit through. Walk him through the process so that he knows what to expect. Also, though it is rare, some people have an allergic reaction to alginate. Mix up a small amount and place it on their wrist and allow it to set up to check for this possibility. It will also let him know what the material feels like his face is covered in it.
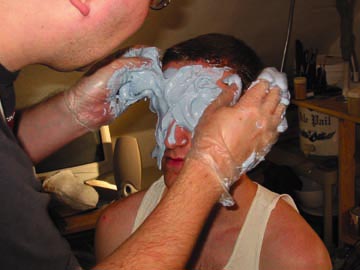
For this face-cast, a bald cap was not used. So I needed to put a small amount of petroleum jelly around his hairline. This prevents the alginate from adhering to the hair, which would make removal of the mold difficult. The eyebrows and eyelashes also get a small amount of petroleum jelly. Let the subject put it in his own eyelashes. Just a little should do. [picture 2]
The alginate tends to slope and drip off the face, so have the subject wear a disposable shirt. You should also cover his waist and legs with a large plastic garbage bag. The floor should also be covered with a tarp.
Step 3) Alginate Application: Add the pre-measured water to the alginate, and mix thoroughly. Be quick about mixing, as you will need all the time before the alginate sets to get it on your subject. If it is too thick, carefully add a small amount of water. If too thin, more alginate. Note: fresh alginate will not adhere to alginate that has set up. So if you need to mix up another batch, make sure that you add it before the other batch sets up.
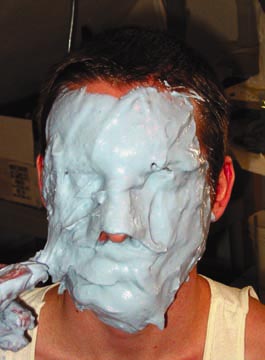
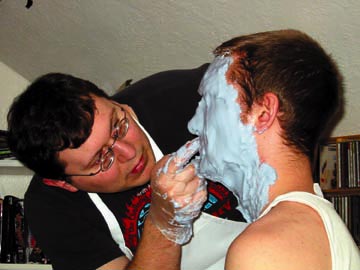
Quickly, but carefully, start covering the subject's face with the mixed alginate. [picture 3] You will have from 8 to 10 minutes working time, so don't waste time. Cover the entire area being cast with an even amount, being sure to get the alginate into all of the areas and recesses of the face. [picture 4] Air bubbles tend to occur right below the eyebrow, between the eye and the nose. During this entire time, keep checking to make sure that the nostrils are not blocked by the slumping alginate. [picture4-5]
This may sound harder than it is to do, but if you're nervous, have an assistant focus on this. In the worst case, you can always wipe it off and start over with a new batch. Reassure your subject by telling them where you are in the process, but do not joke with them. Smiling or laughing can wreck the alginate mold, so keep things serious. Save the goofing for after-word. Once the alginate begins to thicken and stops slumping, leave it to set up, and prepare to add the plaster bandage.
Materials: To create a face-cast like the one described here, you will need the following materials: alginate, plaster bandage, Hydrocal casting plaster, petroleum jelly, a spatula and burlap. Alginate is the goopy material that the initial mold of the face is made out of. It is flexible when set, and non-toxic. If you have ever had your teeth cast by a dentist, you will recognize this material. The type used for face-casting is similar, but has a much slower setting time. For this face-cast, I used Accu-cast brand alginate. All of the materials used here can be purchased from Burman Industries (www.burmanfoam.com). For a cast of a face, the 2.5 lb. package should be enough, but if you plan on doing more life-casts in the future, you may want to invest in one of the larger packages. Extra-Fast Setting Plaster Bandage is used to build a rigid mother mold so that the flexible alginate maintains its shape once removed from the subject. I prefer the 6" wide bandages from Burman. You will only need a roll or two for a face, but it’s always good to have more available. Hydrocal Plaster, Burlap and a small, disposable brush are used to create the final cast.
 picture 1 |
On such a small cast as the one here, one does not necessarily need to measure out the plaster bandage for specific areas of the face, as one does for a larger cast. Just rip off several strips folder over twice, thus making the strips four layers, of approximately 5" each. You may need a few smaller strips for smaller areas, and a small strip for between the nostrils. Make more than you'll need, since you can always use them for your next casting, and having extra is better than running out in the middle of a casting. Also, prepare a bucket of very warm water for dipping the plaster bandages. The warm water will speed up the setting time.
Step 2) Prepare the subject: It's a good idea to give the person you are casting a general idea of what he is about to sit through. Walk him through the process so that he knows what to expect. Also, though it is rare, some people have an allergic reaction to alginate. Mix up a small amount and place it on their wrist and allow it to set up to check for this possibility. It will also let him know what the material feels like his face is covered in it.
 picture 2 |
For this face-cast, a bald cap was not used. So I needed to put a small amount of petroleum jelly around his hairline. This prevents the alginate from adhering to the hair, which would make removal of the mold difficult. The eyebrows and eyelashes also get a small amount of petroleum jelly. Let the subject put it in his own eyelashes. Just a little should do. [picture 2]
The alginate tends to slope and drip off the face, so have the subject wear a disposable shirt. You should also cover his waist and legs with a large plastic garbage bag. The floor should also be covered with a tarp.
 picture 3 |
 picture 4 |
Step 3) Alginate Application: Add the pre-measured water to the alginate, and mix thoroughly. Be quick about mixing, as you will need all the time before the alginate sets to get it on your subject. If it is too thick, carefully add a small amount of water. If too thin, more alginate. Note: fresh alginate will not adhere to alginate that has set up. So if you need to mix up another batch, make sure that you add it before the other batch sets up.
 picture 4-5 |
Quickly, but carefully, start covering the subject's face with the mixed alginate. [picture 3] You will have from 8 to 10 minutes working time, so don't waste time. Cover the entire area being cast with an even amount, being sure to get the alginate into all of the areas and recesses of the face. [picture 4] Air bubbles tend to occur right below the eyebrow, between the eye and the nose. During this entire time, keep checking to make sure that the nostrils are not blocked by the slumping alginate. [picture4-5]
This may sound harder than it is to do, but if you're nervous, have an assistant focus on this. In the worst case, you can always wipe it off and start over with a new batch. Reassure your subject by telling them where you are in the process, but do not joke with them. Smiling or laughing can wreck the alginate mold, so keep things serious. Save the goofing for after-word. Once the alginate begins to thicken and stops slumping, leave it to set up, and prepare to add the plaster bandage.
| -Go To Page 2- |
|
Return to The Articles |


|
|


